Applying Embossing
You can use the Emboss effect to make an image, object, or text appear inset into or raised from the canvas.
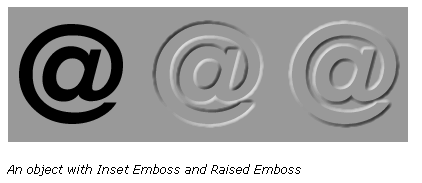
Follow the given instructions exactly to draw the following 3 @'s symbols.
1) Start Fireworks
2) Create a new file according to the following:

3)
Using the Textbox tool![]() ,
create a text box
,
create a text box
4) Type: @
5)
Click on the text box using the pointer tool![]()
6) Change the following in the properties inspector,
- Width: 130
- Height: 130
- Text colour: black and bold
- Font size: 100
- Stroke
colour: black

7)
Using the pointer tool![]() ,
click on the text box,
,
click on the text box,
- Press: Ctrl + C to copy
- Press: Ctrl + V to paste
8)
Using the pointer tool![]() ,
click and drag the new textbox just
to the right of the original one.
,
click and drag the new textbox just
to the right of the original one.
- Press: Ctrl +V to paste another copy
9)
Using the pointer tool![]() ,
click and drag the 3rd textbox to the
right side
,
click and drag the 3rd textbox to the
right side
Your screen should look similar to the following:

10)
Using the pointer tool![]() ,
click on the second text box:
,
click on the second text box:
To apply an Inset Emboss effect:
- Click the Add Effects button in the Property inspector, then choose an emboss option from the pop-up menu:
- Bevel and Emboss > Inset Emboss
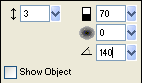
- Edit the effect settings in the pop-up window to the following:
- Width: 3
- Contrast: 70%
- Softness: 0
- Angle: 140
- Click to remove check mark in Show Object box.
- When you finish, click outside the window or press Enter to close it.
11)
Using the pointer tool![]() ,
click on the third text box:
,
click on the third text box:
To apply an Raised Emboss effect:
- Click the Add Effects button in the Property inspector, then choose an emboss option from the pop-up menu:
- Bevel and Emboss > Raised Emboss
- Edit the effect settings in the pop-up window to the following.
- Width: 3
- Contrast: 100%
- Softness: 2
- Angle: 135
- Click to remove check mark in Show Object box.
- When you finish, click outside the window or press Enter to close it.

12) You should now have 3 different @ signs.
Save as: Emboss (in your Text Effects folder)
Proceed to the Using the Polygon Tool.