Tables
Tables are a powerful tool for presenting tabular data and for laying out text and graphics on an HTML page. A table consists of one or more rows; each row consists of one or more cells. Although columns aren’t usually explicitly specified in HTML code, Dreamweaver allows you to manipulate columns as well as rows and cells.
After you create a table you can easily modify both its appearance and structure. You can do any of the following:
- Add content
- Add, delete, split, and merge rows and columns
- Modify table, row, or cell properties
- Copy and paste cells
We are not going to discuss the coding of tables in detail because the code is fairly complicated. Using Dreamweaver to display tables is suggested.
To insert a table, click the Insert Table icon in the common toolbar. The following dialogue box should be displayed.
Some terms you may need to know are:
- Rows – horizontal cells
- Columns – vertical cells
- Border – thickness of border
- Width – percentage of screen width or set size of table
- Cell padding – how much room you would like from the edge of your cell to where the cell contents begin
- Cell spacing – how solid the borders of the table will look
Try This:
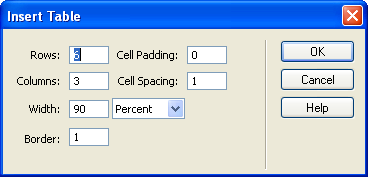
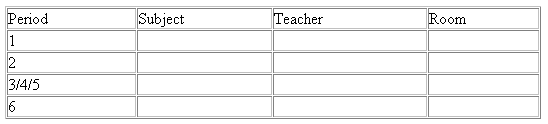
- Click on the timetable.html tab.
- Following the Semester 1 paragraph, insert a table with the following
information:
- Fill in the information according to the following image. If you can't
remember or do not know your room #, make it up.
- Repeat the steps for Semester 2 Courses.
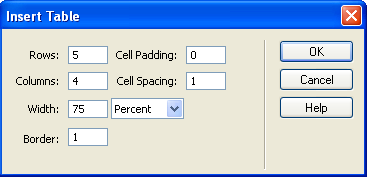
Create tables on other pages according to the following:
Page |
Location |
Rows |
Columns |
Width |
Border |
Cell Padding |
Cell Spacing |
| contact.html | after paragraph | 4 | 4 | 100% | 1 | 2 | 0 |
 |
|||||||
| Fill in the information exactly as you see it above.
Use the mail icon ( |
|||||||
Page |
Location |
Rows |
Columns |
Width |
Border |
Cell Padding |
Cell Spacing |
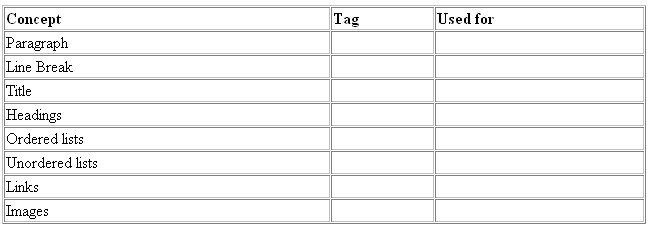
| concepts.html | after HTML paragraph | 9 | 3 | 100% | 1 | 1 | 1 |
 |
|||||||
| Fill in the information once you have completed all tutorials. | |||||||
Page |
Location |
Rows |
Columns |
Width |
Border |
Cell Padding |
Cell Spacing |
| concepts.html | after CSS paragraph | 11 | 2 | 100% | 1 | 1 | 1 |
 |
|||||||
| Choose 10 properties to fill in once you have completed all tutorials. | |||||||
Save all pages to and view in your browser to see how it looks. In Dreamweaver, view the code required to create a table. You should now see why we're using Dreamweaver to create tables.